I needed to export AD Security groups and their memberships, so made a new script based on previous script. I used table variable to sort the export data.
<#.Synopsis
This scripts exports Security Groups and member information from your active directory OU to CSV file
Selected information: Group Name, Info, Description, Username, distinguishedname.
.Description
Writen by Miikka Kallberg
.Parameter FilePath
Path to save the ouput CSV File
.Parameter csvfile
Filename of the output CSV File name
.Parameter OU
Organization Unit where you want to get the user information
.Example
.\groupinfo.ps1 -FilePath c:\temp\ -csvfile marvin.csv -OU Groups
This will export Security Group information from Groups OU to c:\temp\marvin.csv
#>
Param([String]
[Parameter(Mandatory=$true)]
$FilePath='',
[Parameter(Mandatory=$true)]
$csvfile='',
[Parameter(Mandatory=$true)]
$OU='')
#Clear output variables to avoid multiple entries
if ( $FilteredOutput) {
Remove-Variable FilteredOutput}
if ( $Output) {
Remove-Variable Output}
# Import active directory module for running AD cmdlets
Import-Module activedirectory
#Get domain name
$domainname= get-addomain | select distinguishedname
#Filter unneeded information from variable
foreach ($DN in $Domainname)
{
$domain = $Domainname.distinguishedname
}
# Create searchpath combining OU and domain name in correct format
$Oubase="OU=$OU,$Domain"
#Get AD Groups
[array]$Output += Get-ADgroup -filter * -properties CN,Description,Info,distinguishedname -SearchBase "$Oubase"
#Create table in variables
$Table = @()
$Record = @{
"Group Name" = ""
"Username" = ""
"Description" = ""
"Info" = ""
"distinguishedname" = ""
}
#Sort data and add it to the table
Foreach ($Group in $output)
{
$Arrayofmembers = Get-ADGroupMember -identity $Group
foreach ($Member in $Arrayofmembers)
{
$Record."Group Name" = $Group.CN
$Record."UserName" = $Member.samaccountname
$Record."Description" = $Group.Description
$Record."Info" = $Group.Info
$Record."distinguishedname" = $Member.distinguishedname
$objRecord = New-Object PSObject -property $Record
$Table += $objrecord
}
}
#Export table to the table
$Table | export-csv (Join-Path $filepath $csvfile) -NoTypeInformation
Monday, August 10, 2015
Thursday, August 6, 2015
Connection Report for Remote Desktop
I came across this Powershell script, I haven't done any modifications, but I wanted to add this to my collection, since I tend to forget where I found information/scripts.
This has been writen by Mike Crowley, link to his blog: https://mikecrowley.wordpress.com
Link to his blog post: https://mikecrowley.wordpress.com/2015/04/08/a-new-and-an-updated-powershell-script/
UPDATE 10th August 2015:
I noticed that if I run the script more than once, it makes multiple entries. I added Remove-Variable command to the beginning to make sure that results are correct.
UPDATE 10th August 2015:
I noticed that if I run the script more than once, it makes multiple entries. I added Remove-Variable command to the beginning to make sure that results are correct.
The script:
<#
Features:
1) This script reads the event log "Microsoft-Windows-TerminalServices-LocalSessionManager/Operational" from multiple servers and outputs the human-readable results to a CSV.
Instructions:
1) Before you run, edit this line to include one or several of your own servers.
Requirements:
1) TBD
April 8 2015 - Version 0.2
Mike Crowley
http://BaselineTechnologies.com
#>
#Clear output variables to avoid multiple entries
#Added by Miikka Kallberg 10th August 2015
if ( $FilteredOutput) {
Remove-Variable FilteredOutput}
if ( $Output) {
Remove-Variable Output}
#
#Added by Miikka Kallberg 10th August 2015
if ( $FilteredOutput) {
Remove-Variable FilteredOutput}
if ( $Output) {
Remove-Variable Output}
#
$SessionHosts = @('Server2', 'Server3', 'Server4', 'Server5')
foreach ($Server in $SessionHosts) {
$LogFilter = @{
LogName = 'Microsoft-Windows-TerminalServices-LocalSessionManager/Operational'
ID = 21, 23, 24, 25
}
$AllEntries = Get-WinEvent -FilterHashtable $LogFilter -ComputerName $Server
$AllEntries | Foreach {
$entry = [xml]$_.ToXml()
[array]$Output += New-Object PSObject -Property @{
TimeCreated = $_.TimeCreated
User = $entry.Event.UserData.EventXML.User
IPAddress = $entry.Event.UserData.EventXML.Address
EventID = $entry.Event.System.EventID
ServerName = $Server
}
}
}
$FilteredOutput += $Output | Select TimeCreated, User, ServerName, IPAddress, @{Name='Action';Expression={
if ($_.EventID -eq '21'){"logon"}
if ($_.EventID -eq '22'){"Shell start"}
if ($_.EventID -eq '23'){"logoff"}
if ($_.EventID -eq '24'){"disconnected"}
if ($_.EventID -eq '25'){"reconnection"}
}
}
$Date = (Get-Date -Format s) -replace ":", "."
$FilteredOutput | Sort TimeCreated | Export-Csv $env:USERPROFILE\Desktop\$Date`_RDP_Report.csv -NoTypeInformation
#End
Tuesday, August 4, 2015
This script deletes symLinks to project data folders based on csv file
This script deletes symlinks on data folders based on CSV file.
Customer had a linux based file server on a MS Remote Desktop environment. They replaced it with Windows server, but they wanted to have the Windows server to act just like the old linux server. RD farm is locked down, and users cannot browse network or map drives on their own. I have few other post how to map drives with login script with powershell. To make things a bit more tricky, they are using project-001 syntax on group and OU names, but 001 on folder names.
<#.Synopsis
This script deletes symLinks to project data folders based on csv file.
File Format:
Project,Data
.Description
Writen by Miikka Kallberg
.Parameter FilePath
Path to CSV File
.Parameter csvfile
CSV File name
.Example
.\removedatalinks.ps1 -FilePath c:\temp\ -csvfile project.csv
This will make link to project folders from Project.csv file
#>
#Define script parameters
Param([String]
[Parameter(Mandatory=$true)]
$FilePath='',
[Parameter(Mandatory=$true)]
$csvfile='')
#Define funtion for deleting SymLinks
Function Remove-SymLink ($link)
{
if (test-path -pathtype container $link)
{
$command = "cmd /c rmdir"
}
else
{
$command = "cmd /c del"
}
invoke-expression "$command $link"
}
#Import CSV file
$projectCSV = Import-Csv "$FilePath\$csvfile"
#Look each line
foreach ($csv in $projectcsv)
{
#Define variables
$Project = $csv.project
$Data = $csv.data
$projectpath = "d:\fileshare\data\projects"
$link = "$projectpath\$project\data\$data"
#Remove SymLinks
Remove-SymLink $link
}
#Clear variables
$csv = ""
$Project = ""
$Data = ""
$projectpath = ""
$link = ""
$command = ""
Create symLinks to project data folders and add projects to data groups from csv file with Powershell
This script creates symlinks on data folders based on CSV File and names and adds project security groups to correct data groups.
Customer had a linux based file server on a MS Remote Desktop environment. They replaced it with Windows server, but they wanted to have the Windows server to act just like the old linux server. RD farm is locked down, and users cannot browse network or map drives on their own. I have few other post how to map drives with login script with powershell. To make things a bit more tricky, they are using project-001 syntax on group and OU names, but 001 on folder names.
<#.Synopsis
This script makes symLinks to project data folders and adds projects to data groups from csv file.
File Format:
Project,Data
.Description
Writen by Miikka Kallberg
.Parameter FilePath
Path to CSV File
.Parameter csvfile
CSV File name
.Example
.\projectdatalinks.ps1 -FilePath c:\temp\ -csvfile project.csv
This will make link to project folders from Project.csv file
#>
#Define script parameters
Param([String]
[Parameter(Mandatory=$true)]
$FilePath='',
[Parameter(Mandatory=$true)]
$csvfile='')
#Define funtion for creating SymLinks
Function New-SymLink ($link, $target)
{
if (test-path -pathtype container $target)
{
$command = "cmd /c mklink /d"
}
else
{
$command = "cmd /c mklink"
}
invoke-expression "$command $link $target"
}
#Import CSV file
$projectCSV = Import-Csv "$FilePath\$csvfile"
#Look each line
foreach ($csv in $projectcsv)
{
#Define variables
$Project = $csv.project
$Data = $csv.data
$datapath = "\\server\data\data"
$projectpath = "d:\fileshare\data\projects"
$link = "$projectpath\$project\data\$data"
$target = "$datapath\$data"
$Projectgroup= "Project-$Project"
$DataGroup = "data-$Data"
#Create Data, Output and Work Folders under projects
New-Item -ItemType Directory -Force -Path $projectpath\$project\data\
New-Item -ItemType Directory -Force -Path $projectpath\$project\output\
New-Item -ItemType Directory -Force -Path $projectpath\$project\work\
#Check if link already exists
If (Test-Path $link){Write-Host $link already exists}
Else{
#Create SymLinks
New-SymLink $link $target
}
# Add projects security groups to data group based on CSV file
Add-ADGroupMember -Identity $DataGroup -Members $Projectgroup
}
#Clear variables
$csv = ""
$Project = ""
$Data = ""
$datapath = ""
$projectpath = ""
$link = ""
$target = ""
$command = ""
Creating file directories based on AD OrganisationalUnits names
This script creates data folders based on OU/Group names and adding user rights for correct groups.
Customer had a linux based file server on a MS Remote Desktop environment. They replaced it with Windows server, but they wanted to have the Windows server to act just like the old linux server. RD farm is locked down, and users cannot browse network or map drives on their own. I have few other post how to map drives with login script with powershell. To make things a bit more tricky, they are using project-001 syntax on group and OU names, but 001 on folder names.
#Set Variables
$ou = "Users"
$project = "project*"
$HomePath = "C:\temp\test"
$temppath = "c:\temp"
$groupprefix = "project-"
#Get domain name
get-addomain | select distinguishedname -OutVariable Domainname
#Filter unneeded information from variable
foreach ($DN in $Domainname)
{
$domain = $Domainname.distinguishedname
}
# Create searchpath combining OU and domain name in correct format
$Oupathe="OU=$OU,$Domain"
#Set-Location to $TempPath
Set-Location $temppath
# Get OU names to CSV file
Get-ADOrganizationalUnit -filter * -SearchBase:"$oupath" | Select-Object -Property Name | Where {$_.name -Match $project} | export-csv $temppath\projectfolder.csv
#Remove Project from OU names in CSV file
[io.file]::readalltext("$temppath\projectfolder.csv").replace("project-","") | Out-File $temppath\projectfolders.csv -Encoding ascii –Force
#Set Location to $HomePath
Set-Location $HomePath
#Import folder list to $folders variable
$Folders = Import-Csv $temppath\projectfolders.csv
#Create folders
ForEach ($Folder in $Folders) {
New-Item $Folder.Name -type directory
}
#Set Access Permissions
ForEach ($Folder in $Folders) {
$i=$Folder.Name
$GroupName = "$groupprefix$i"
$ACL = Get-Acl "$HomePath\$i"
$ACL.SetAccessRuleProtection($true, $false)
$ACL.AddAccessRule((New-Object System.Security.AccessControl.FileSystemAccessRule("$NTDomain\Domain Admins","FullControl", "ContainerInherit, ObjectInherit", "None", "Allow")))
$rule = New-Object System.Security.AccessControl.FileSystemAccessRule("$NTDOMAIN\$GroupName","Modify", "ContainerInherit, ObjectInherit", "None", "Allow")
$acl.AddAccessRule($rule)
Set-Acl "$HomePath\$i" $ACL
}
Set-Location $temppath
#delete temp files
remove-item -path $temppath\projectfolder.csv
remove-item -path $temppath\projectfolders.csv
#Clear variables
$ACL =""
$folders =""
$folder =""
$GroupName =""
$i =""
$rule =""
$NTDomain = ""
$oupath = ""
$project = ""
$HomePath = ""
$temppath = ""
$groupprefix = ""
Mapping network drives based on AD security group membership
This script maps network drives on login based on AD security group membership.
Customer had a linux based file server on a MS Remote Desktop environment. They replaced it with Windows server, but they wanted to have the Windows server to act just like the old linux server. RD farm is locked down, and users cannot browse network or map drives on their own. I have few other post how to create data folders based on OU/Group names and making hard links between different folders based on csv file, and adding user rights for correct groups. To make things a bit more tricky, they are using project-001 syntax on group and OU names, but 001 on folder names.
#Login script that maps network drives and renames them based on users AD Security Group Membership
#Security group name format is project-001 etc and related folders are named 001 (same number without project- prefix)
#Drives are renamed ad username-data etc
#Get AD Group memberships
Get-ADPrincipalGroupMembership "$env:username" | select name | Where {$_.name -Match "project-*"} | export-csv $env:temp\gp.csv
#Remove Project from OU names in CSV file
[io.file]::readalltext("$env:temp\gp.csv").replace("project-","") | Out-File $env:temp\gp.csv -Encoding ascii –Force
#Import folder list to $folders variable
$axxx = Import-Csv $env:temp\gp.csv
#Modify variables
$axx = $axxx.name
$usr = $env:username
#Create Drive maps
$Net = $(New-Object -ComObject WScript.Network)
$Net.MapNetworkDrive("D:", "\\server\data\projects\$axx\data")
$Net.MapNetworkDrive("M:", "\\server\data\metadata")
$Net.MapNetworkDrive("O:", "\\server\data\projects\$axx\output")
$Net.MapNetworkDrive("w:", "\\server\data\projects\$axx\work")
$Net.MapNetworkDrive("x:", "\\server\profiles$\$usr")
$Net.MapNetworkDrive("p:", "\\Server\programs")
#Label Drives
$Ren = New-Object -ComObject Shell.Application
$Ren.NameSpace("D:\").Self.Name = "$usr-Data"
$Ren.NameSpace("M:\").Self.Name = "$usr-MetaData"
$Ren.NameSpace("O:\").Self.Name = "$usr-Output"
$Ren.NameSpace("W:\").Self.Name = "$usr-Work"
$Ren.NameSpace("X:\").Self.Name = "$usr-Home"
$Ren.NameSpace("P:\").Self.Name = "Programs"
#delete temp files
remove-item -path $env:temp\gp.csv
#Clear variables
$usr = ""
$Net = ""
$axxx = ""
$axx = ""
$Ren = ""
Export Security Group Information from AD to CSV file
This Script exports Security Group Information from AD to CSV file
<#.Synopsis
This scripts exports Security Groups information from your active directory OU to CSV file
Selected information: CN,Description,Info,distinguishedname.
.Description
Writen by Miikka Kallberg
.Parameter FilePath
Path to save the ouput CSV File
.Parameter csvfile
Filename of the output CSV File name
.Parameter OU
Organization Unit where you want to get the user information
.Example
.\groupinfo.ps1 -FilePath c:\temp\ -csvfile marvin.csv -OU Groups
This will export Security Group information from Groups OU to c:\temp\marvin.csv
#>
Param([String]
[Parameter(Mandatory=$true)]
$FilePath='',
[Parameter(Mandatory=$true)]
$csvfile='',
[Parameter(Mandatory=$true)]
$OU='')
# Import active directory module for running AD cmdlets
Import-Module activedirectory
#Get domain name
get-addomain | select distinguishedname -OutVariable Domainname
#Filter unneeded information from variable
foreach ($DN in $Domainname)
{
$domain = $Domainname.distinguishedname
}
# Create searchpath combining OU and domain name in correct format
$Oubase="OU=$OU,$Domain"
Get-ADgroup -filter * -properties CN,Description,Info,distinguishedname -SearchBase "$Oubase" | select CN,Description,Info,distinguishedname | ConvertTo-Csv | Out-File (Join-Path $filepath $csvfile)
Bulk Import Users from CSV
There are number of scripts about this available, but here is my version of bulk-import users from csv file.
<#.Synopsis
This to import users to contoso.local domain from csv file by default. You can also configure different domain.
CSV File Format:
Name,samAccountName,ParentOu,Description,Password,UserGroup
NOTE!! ParentOu Format "OU=SubOrganisationalUnit,OU=OrganisationalUnit,DC=Domain,DC=local"
.Description
Writen by Miikka Kallberg
.Parameter FilePath
Path to CSV File
.Parameter csvfile
CSV File name
.Parameter DomainName
Type domain name
.Example
.\bulkimportusers.ps1 -FilePath c:\temp\ -csvfile marvin.csv
This will export users from c:\temp\marvin.csv to contoso.local domain
.\bulkimportusers.ps1 -FilePath c:\temp\ -csvfile marvin.csv -Domain whatnow.local domain
This will import users from c:\temp\marvin.csv to whatnow.local domain
#>
Param([String]
[Parameter(Mandatory=$true)]
$FilePath='',
[Parameter(Mandatory=$true)]
$csvfile='',
[String]
$Domainname='contoso.local')
# Import active directory module for running AD cmdlets
Import-Module activedirectory
#Store the data from ADUsers.csv in the $ADUsers variable
$ADUsers = Import-csv "$FilePath\$csvfile"
#Loop through each row containing user details in the CSV file
foreach ($User in $ADUsers)
{
#Read user data from each field in each row and assign the data to a variable as below
$Username = $User.name
$Password = $User.password
$Firstname = $User.name
$Lastname = $User.name
$Descripte = $User.Description
$UserGroup = $User.UserGroup
$OU = $User.ParentOu #This field refers to the OU the user account is to be created in
#Check to see if the user already exists in AD
if (Get-ADUser -F {SamAccountName -eq $Username})
{
#If user does exist, give a warning
Write-Warning "A user account with username $Username already exist in Active Directory."
}
else
{
#User does not exist then proceed to create the new user account
#Account will be created in then Users OU.
New-ADUser -SamAccountName $Username -UserPrincipalName "$Username@$DomainName" -Name $Lastname -Description $Descripte -Path $OU -AccountPassword (ConvertTo-SecureString $Password -AsPlainText -Force) -Enabled $true
#Add New User to UserGroup
Add-ADGroupMember -Identity $UserGroup -Members $Username
}
}
Export AD User Information to CSV
In some cases, I have been asked to list users and their contact information from Active Directory.
In large organisations you don't want to export all users information, just from specific Organisation Units.
Here is simple script to do it.
<#.Synopsis
This scripts exports users information from your active directory OU to CSV file
Selected information: CN,GivenName,Surname,Description,EmailAddress,TelephoneNumber,Info,distinguishedName.
.Description
Writen by Miikka Kallberg
.Parameter FilePath
Path to save the ouput CSV File
.Parameter csvfile
Filename of the output CSV File name
.Parameter OU
Organization Unit where you want to get the user information
.Example
.\userinfo.ps1 -FilePath c:\temp\ -csvfile marvin.csv -OU Users
This will import users from Users OU to c:\temp\marvin.csv
#>
Param([String]
[Parameter(Mandatory=$true)]
$FilePath='',
[Parameter(Mandatory=$true)]
$csvfile='',
[Parameter(Mandatory=$true)]
$OU='')
# Import active directory module for running AD cmdlets
Import-Module activedirectory
#Get domain name
get-addomain | select distinguishedname -OutVariable Domainname
#Filter unneeded information from variable
foreach ($DN in $Domainname)
{
$domain = $Domainname.distinguishedname
}
# Create searchpath combining OU and domain name in correct format
$Oubase="OU=$OU,$Domain"
Get-ADUser -filter * -properties CN,GivenName,Surname,Description,EmailAddress,TelephoneNumber,Info,distinguishedName -Searchbase "$Oubase" | select CN,GivenName,Surname,Description,EmailAddress,TelephoneNumber,Info,distinguishedName | ConvertTo-Csv | Out-File (Join-Path $filepath $csvfile)
Monday, August 3, 2015
My Powershell script collection
I originally planned to just post all scripts on same blog post, but I just realised that it would be horrible to read, so I decided that I will put one script/post and link all posts to this post.
I will update new scripts when I have time.
I will update new scripts when I have time.
Updated 6th of April 2016
Bulk import AD users from CSV File
Export user information from AD to CSV file
Export security group information from AD to CSV file
Mapping network drives based on AD security group membership
Creating file directories based on AD OrganisationalUnits names
Create symLinks to project data folders and add projects to data groups from csv file
This script deletes symLinks to project data folders based on csv file
Connection Report for Remote Desktop
Export Security Groups and Members to csv file
Restoring database with powershell
SFTP Transfer script with logging
Love-hate relationship with Powershell
I have been using Windows since 3.1 version, I started my IT career with Windows NT 3.5. Back in days when I started, I did most of management with GUI, but in some cases it was impossible, so I was forces to create complex command line scripts.
Link to the script collection:
http://miscproject.blogspot.fi/2015/08/my-powershell-script-collection.html
My first encounter with Powershell was with Exchange 2007. There was number of things, that you couldn't do with GUI. I have to confess that I haven't really liked Powershell. I have only used Powershell when I had to. Recent projects I have had to do few things with Powershell and now I have learned to love it. There are still number of things I don't like in it, but I have to admit Powershell helps me to do my work better and faster.
Microsoft has great video training material about PowerShell and scripting for free at www.microsoftvirtualacademy.com
I work with number of different environments and projects, and there are some basic powershell scripts that I have been using in different environments. My plan is to collect the scripts that I have been using to this blog. Most of the scrips are quite basic, but they have helped me. The script library will also work as a notepad for me, so I can easily check and read my own scripts.
Link to the script collection:
http://miscproject.blogspot.fi/2015/08/my-powershell-script-collection.html
Thursday, July 30, 2015
Branding Microsoft Remote Desktop Web Access 2012 R2
I have been working on few Microsoft Remote Desktop Services implementation on Windows Server 2012 R2. Recently I was asked to customise the remote desktop web access site. I found few great blog post about customising website but there wasn't too many posts about branding RDS on Windows 2012 R2. Against all good IT principals, I decided to make proper documentation of the installation. Because there wasn't too much information available, I decided to write a public post about it.

to <tr style="display:none">


Link to blog that I have been using as reference:
Backup RD Web Access Site
Before making any changes, I recommend to take a backup of the RD Web Access files. Easiest way to do this is just take a copy of C:\Windows\Web\RDWeb folder to some safe place.
IIS Redirection
By default when you write server name to address you land to IIS default site. The RD Web Access is on http://rdwebserver.domain.local/rdweb url. I want users to land on the RD web access page directly. Easiest way to do this from IIS Manager.
Open IIS Manager and navigate to Default Web Site and open Folder Redirection.
Select Redirect requests to this destination and write /RDWeb to the destination. Save settings and restart IIS.

Removing the domain prefix requirement
I followed instructions form this Arjan Mensch's blog post.
Cleaning up the RD Web Access login page
I wanted to clean login page from all Microsoft look and feel.
Remove Help button from login page
This part is copied from Arjan Mensch's blog post:
Arjan has gone through many other customisations that I didn't need, so I found it easier to just copy and paste the parts I did in this project.
To hide the Help link on the login page you need to edit %windir%\web\rdweb\pages\site.xsl.
Go to line 152.
Change this line to look like this: <!--<a id='PORTAL_HELP' href="javascript:onClickHelp()">
And change line 154 to look like this: </a>-->
Making these two changes turns the code to display the link into a comment and thus hidden. Save the file.
Note: this removes the link from the login and password pages only. After logging in you’ll see the link is still there on the main page.
Force Security settings to Public
This part is copied from Arjan Mensch's blog post:
We need to fix two thing to be able to force users to the public setting without means to change it.
Edit “login.aspx”.
Change lines 523, 532, 536, 556, 576 and 587 from <tr>
to <tr style="display:none">
These changes will effectively hide the user interface for changing the security setting. Save the file.
Edit “webscripts-domain.js” and go to line 14:
var bPrivateMode = document.getElementById("rdoPrvt").checked;
Change this line to: var bPrivateMode = false;//document.getElementById("rdoPrvt").checked;
This change will force the code to always configure for public mode. Save the file.
Refresh or open the Web Access page and you’ll see the interface options for choosing a security mode is gone.
Remove gray dividers and disclaimer
This part is copied from Arjan Mensch's blog post:
To hide the grey dividers as well you’ll need to edit “login.aspx” again.
Change lines 513, 516, 519, 597, 609 and 612 from <tr>
to <tr style="display:none">
To remove or edit disclaimer you need to edit “login.aspx” and move to line number 41 and change it to look like this:
const string L_TSWATimeoutLabel_Text = "" ;
You can also insert your custom disclaimer there.
After these changes RD web access login page should like like this:
Changing RD Workspace name and title
By default RD Workspace name is Work Resources. This can be changed from RD Connection broker with powershell.
Login to RD Connection broker with account that has domain admin rights and open Powershell.
Type following commands:
import-module remotedesktop
Set-RDWorkspace -Name "Your own RD Farm"
To change site title and text below the RD Workspace name you need to edit %windir%\web\rdweb\pages\en-US\RDWAStrings.xml
This file contains labels and texts that are used everywhere in RD Web Access site, not just on the login page. Just few examples:
Line 3 contains page title:
<string id="PageTitle">RD Web Access</string>
Line 10 contains the text on top right corner:
<string id="HeadingRDWA">RD Web Access</string>
Line 11 contains the text under RD Workspace name:
<string id="HeadingApplicationName">RemoteApp and Desktop Connection</string>
Branding the RD Web Access login page
Login page texts
Other texts and messages on RD Web Access login page can be changed by editing %windir%\web\rdweb\pages\en-US\login.aspx
You can find text under Localizable Text comment, on lines 19 - 49.
Login page images and colors
To change site logos and colors you need to edit %windir%\web\rdweb\pages\site.xls
This file is quite well commented, so you can find quite easily where everything is, so I am not going to too much details on this.
The logo on top right corner is on line 91:
<img src="../images/logo_01.png" width="16" height="16"/>
You can either change own logo here, or just comment the line out like this:
<!-- <img src="../images/logo_01.png" width="16" height="16"/> -->
The logo on top left corner just besides the workspace name can be found below text Replaceable Company Logo Image on line 117:
<img src="../images/logo_02.png" width="48" height="48"/>
You can just save your own logo file to images folder and change it here.
The logo on bottom left corner is on line 207:
<img src="../images/WS_h_c.png" width="143" height="20"/>
The logo on bottom right corner is on line 217:
<img src="../images/mslogo_black.png" width="63" height="10"/>
You can either change these logos to your own, or just comment the line out.
Branding Remote Desktop page
Most of changes described earlier on this post are global, so they affect also the Remote Desktop page.
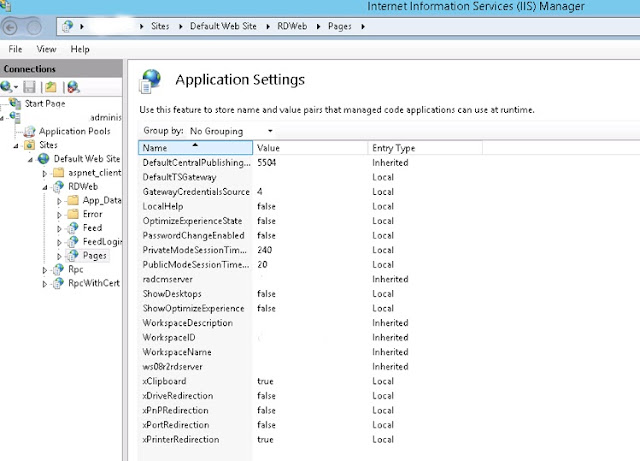
Remove "Connect to a remote PC" Option
This can be done easily from IIS Manager.
Open IIS Manager and navigate to Site, Default Web Site, RDWeb and Pages.
Open Application Settings and change Show Desktops to false.
Removing Current Folder Text
This part is copied from Arjan Mensch's blog post:
Edit %windir%\web\rdweb\pages\site.xsl.
This is just below <!-- deal with folder icons and labels --> comment, on line 529 (if you haven't edited this file before)
<div class="tswa_CurrentFolderLabel"><xsl:value-of select="$strings[@id = 'CurrentFolder']"/><span><xsl:attribute name='id'><xsl:value-of select="$feedidprefix"/>CurrentFolderPath</xsl:attribute><xsl:value-of select="appfeed:Publisher[1]/@DisplayFolder"/></span></div>
Anyway, you’ll need to edit the line to look like this:
<div class="tswa_CurrentFolderLabel"><span><xsl:attribute name='id'><xsl:value-of select="$feedidprefix"/>CurrentFolderPath</xsl:attribute><xsl:value-of select="substring-after(appfeed:Publisher[1]/@DisplayFolder, '/')"/> </span></div>
If you just want to change the text to something else, this can be done by editing %windir%\web\rdweb\pages\en-US\RDWAStrings.xml
Removing RemoteApp and Desktops text
Edit %windir%\web\rdweb\pages\en-US\default.aspx.
This information is found on Line 18:
const string L_RemoteAppProgramsLabel_Text = "RemoteApp and Desktops";
You can simply just delete the text, or insert your custom text here.
Conclusion
Windows Server 2012 R2 Remote Desktop Services Web Access can be customised with out 3rd party software or consultation. I will probably update this post later when I find other things I need to change. I hope this is helpful!
Subscribe to:
Posts (Atom)